Monday, August 27, 2012

Around the House - DIY Stain Remover Test

I was excited when saw this pin for a stain remover, because it said that it would take stains out of almost anything, even if they're old.


My first test stain is one that I've been fighting for a couple of weeks.  It's on the collar of one of my husband's shirts and I have no idea what it actually is.  I didn't discover the stain until the shirt had been washed and dried, so it's fairly set in.  Hence why I was happy that the stain remover from the pin supposedly works on old stains.  Before this stain remover test, I had also tried using Shout, and a baking soda/peroxide paste.  Alas, my stain is still evident as you can see below:


The DIY stain remover from the pin is super simple to throw together - two parts hydrogen peroxide to one part Dawn liquid dish soap.  Easy peasy.


(Note the cameo appearance by the spoon that's older and I am which also guest stars in this previous post.)


I noticed in the blog post from the original pin that the blogger washed their test garment right after applying the stain remover.  According to their picture, it did indeed remove their stains nicely.  I let it sit for about an hour, since I had no idea what my stain was actually from and it's pretty set in, having been through a few wash and dry cycles already.  I washed it in cold water and my results are below:


Bummer, man.  The stain is still visible and I don't notice any particular lightening of the stain, either.  

DIY Stain Remover Test 1 = Fail.

Later in the day, I noticed a stain on one of my daughter's t-shirts as I pulled it out of the dryer.  Clearly, I don't look closely enough at our laundry before I wash it.  I decided to try the test again to see if it would work on a stain of known circumstances.

This time, I know the stain occurred a few days ago and it's origin is chocolate frozen yogurt:


I repeated the same process as test # 1 to mix and apply the stain remover solution.  I had high hopes this time because as soon as I applied the mixture, the area of the stain bubbled up nicely, which hadn't happened at all on the previous test.  I let it sit for about an hour again and decided to try washing in warm water this time, to see if that made a difference.

The results:


Definitely lighter, but still visible.  Incidentally, I then applied Shout to the stain above and it came right out after another washing.

DIY Stain Remover Test # 2 = Fail.

Bummer.

Wednesday, August 22, 2012

Pin Testing - How To Get Whiter Nails

I know I promised a riveting post today on Pinterest side dishes, but I went ahead and tested out a pin and thought I would share the results.  Today's pin-speriment comes from my Good Ideas board and promises to remedy yellow discolored fingernails that you get from wearing nail polish for too long.


How to Get Whiter Nails
Source: shape.com via Lindsey on Pinterest

If you're a man (or at least a man that doesn't wear nail polish), you're not going to understand and/or care about this issue at all.  This is a problem I know well, as my fingernails are painted 95% of the time and my toenails are painted 100% of the time.  To me, naked toenails = ick.  Since I'm not planning to get a pedicure until this weekend and absolutely cannot leave the house with naked toes, I tested out said pin on my fingernails only.

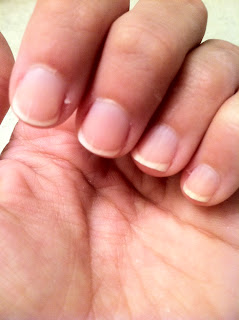
In my 'before' picture below, the yellowing on my fingernails is kind of hard to see.  I took about 872 pictures  and couldn't capture it properly with my iPhone or my Canon Power Shot.  If you look closely, you can see where white healthy nail has started to grow in at the top of each nail bed.


The 'Before' Nails
The caption of the pin had the following directions:  How to get white nails -- make a paste using 1 tbsp peroxide and 2 1/4 tbsp baking soda. Let this paste sit on your nails for 5 minutes and voila! White nails! REMEMBER THIS AFTER USING BRIGHT NAIL POLISH!

When you mix the paste of baking soda and peroxide together, it looks like this (Pay special attention to the awesome 70s style spoon that may parents got as part of their wedding flatware in 1973.  The marriage = dead since 1981.  The spoon = still kicking it almost 40 years later):


I mixed the baking soda and peroxide glop together and piled it on my nails using a small paint brush since the directions didn't really specify HOW to apply said glop.  You're dying to know what that looks like, right?


I have no idea if that's what the pinner had in mind for this but there it is.  I let this sit for the five minutes as directed before rinsing off.  Here is the 'before' picture (again) on the top and the 'after' picture on the bottom (I would put them side by side but uploading photos in Blogger sucks and I can't figure out how to do that):


'Before' Nails
'After' Nails - Baking Soda/Peroxide Test
If anything, I think the yellowing is more noticeable in the 'after' picture than it was in the 'before' shot.  Test #1 for 'How to Get Whiter Nails' = FAIL.

After the crash and burn results of the first nail whitening treatment, I decided to actually click through to the link on the pin to see if those directions were any different.  It took me a while to actually find the directions in the Shape magazine article.  It turns out that the actual directions were to scrub your nails with whitening toothpaste and a nail brush with zero mention of either baking soda OR peroxide.   WTF Pinterest?

Anyway, I grabbed some whitening toothpaste from my travel kit and an old toothbrush, because I don't actually own a nail brush.  Well, I did at one time but I have two daughters who like to borrow steal my stuff on a regular basis, so the toothbrush was going to have to do for purposes of the next test.  The directions in the article didn't actually specify how much toothpaste to use or how long to scrub your nails for (I'm learning that some pins aren't very specific, which sucks for people like me who need clear and concise directions). 


The supplies for 'Whiter Nails - Take Two'
I globbed some toothpaste on the brush and got good and scrubby for five minutes, figuring I would use the timeframe from the original test since Shape magazine doesn't like to give clear directions when handing out beauty tips, apparently.


Minty fresh fingers
When I finished scrubbing and rinsed again, I again admired my handiwork.  The 'before' (again) is on the right and the 'after' is on the left (and no, I don't know why these two pictures don't have a huge space between them, thanks Blogger):

'Before' Nails
'After' Nails - Toothpaste Test
Some observations:

1 - I don't see a noticeable difference in the yellowing after this test, either.
2 - As you can see in the 'after' picture, my nails now have some weird white lines on them like they're all dried out or something.  I'm very excited about that.
3 - If you look close enough at my palm in the 'after' picture, you'll see that the toothpaste left some weird white dots on my skin that won't come off, and I have no idea why.

Test #2 for 'How to Get Whiter Nails' = FAIL.

If anything, my nails are worse off than when I started.  The verdict on 'How to Get Whiter Nails' is:  Sucky Pin. 

Thanks for nothing, Pinterest.

Tuesday, August 21, 2012

The Dish on Pinterest - Part One

So far, my only foray in to actually attempting some of my pins from Pinterest has been trying out some of the various recipes I've pinned. My food board has exactly 100 pins right now, so it clearly has the most pins of any of my boards, by far.

In no specific order, here are some of the main dish recipes I've tried thus far and opinions on the varying results:

Slow Cooker Salsa Chicken

This recipe gets five stars for simplicity and versatility and four stars for taste. I threw my chicken breast in the crock pot still frozen, mixed in the taco seasoning, a can of cream of chicken soup and a cup of salsa and we were off and cooking. Right before serving, shred the chicken and add half a cup of sour cream.

I served this in soft taco shells with yellow rice and black beans but the taco filling would be great for burritos, enchiladas, a chicken rice bowl (which I had for lunch today with the leftovers)...the possibilities are pretty endless.

Two thumbs up from all in our household.

Creamy Italian Chicken


There are about 872 pins for something called Creamy Italian Chicken, but I made it from the pin shown above. The caption on the pin was 'Holy moly this was good!' Based on that and the ingredient list which had things like cream cheese and a packet of dry Italian dressing, I had high expectations for this one. Unfortunately, they were not met. Holy moly this was NOT good.

Now, I tend to make my recipes a little healthier by using Healthy Request soups which are low fat and low sodium and using reduced fat cream cheese in recipes that call for those ingredients, so maybe that had something to do with it. That said, I do that ALL the time and I never have any problems, but we did not like this recipe. The cream cheese never really broke down in the sauce so everyone had weird clumps of cream cheese on their plates and the overall texture of the sauce was weirdly gritty. Just, ick. There are plenty of pins in the sea and I won't be re-visiting that one any time soon.

Baked Parmesan Chicken


The caption on this one calls it OMG Chicken. I'll give it an OMG for simplicity, but maybe just an O and an M for taste. You can't get much easier than mixing 1/4 cup parmesan cheese with 1/2 cup of sour cream, spreading it on the breasts (your chicken breasts that is, for anyone that is confused) and sprinkling on some bread crumbs before throwing it in the oven for 20 minutes or so. I'm not really sure why, but this chicken comes out super juicy and it tastes kind of similar to a chicken cordon bleu without the ham. Everyone in my house liked it and I also like that the options for what to serve this with are pretty flexible - it goes well with potatoes, rice, pasta or even just a green salad.

One interesting note about this one: the recipe I just mentioned above is in the caption of the pin but the actual pin links to a recipe that uses mayonnaise instead of sour cream. We aren't huge fans of mayo in my house, so I went with light sour cream and thought it was tasty. Feel free to mayo it up if you are so inclined.

Coming up tomorrow - Pinterest side dishes!

Monday, August 20, 2012

Pinterest, I Just Can't Quit You

Have you ever innocently pinned something on Pinterest that looked easy to do, only to have it all go horribly wrong when you tried out the pin for yourself? I have, more than once. Have you experienced the euphoria of discovering that some of the pins on Pinterest actually work? I've done that also. How about some pins that once you tried them, just left you thinking, "Meh." Yeah, me too.

According to my pins, I have aspirations to do the following, among other things:

- Make every meal for the rest of my life in my crock pot.
- Make my own clothes from random old t-shirts even though I can't sew.
- Build some furniture from assorted detritus like pallets, match sticks and Elmer's glue even though I've barely even swung a hammer like, ever.
- Paint my own wall art even though I can't even draw stick figures.
- Grow a green thumb and plant things that I'll expect to grow, when I've killed every plant we've ever had.
- Oh, and also spray paint the shit out of everything in sight. And maybe slap on a monogram sticker or two for good measure.

Why do I want to do all of these things, you ask? Because Pinterest makes it look SO easy. Snip, snip, glue, sew and you have a handy dandy scarf! Look! I made this awesome bookshelf from old pallets - awesome. All you need to make this cool picture is some spray paint and leaves, simple! Throw these three ingredients in your crock pot and voila, three course meal - great!

So, we've established that I can't sew, knit, paint, draw, crochet or anything else even remotely crafty. I'm a fairly decent cook, although my skills definitely fall on the side of home cook as opposed to gourmet chef. I've decided to try out some pins, to see if even a non-crafty, chef-y, builder-y type can actually succeed at various Pinterest projects that are proclaimed SO EASY by people who have years of crafting, chef'ing, building, etc. under their belts. I figure that documenting it here will 1) actually make me try some of the stuff I pin and 2) possibly help other non-crafty types in their quest to make sew, build, paint, cook, etc.

This should get interesting.